Note: An .img file is needed in the case of Ubuntu demos since Ubuntu uses an additional Linux formatted partition that is large and difficult to deploy under Windows other than this method.
Note: Some non-Ubuntu demos do not contain a Pre-Built SD image. If this is the case, please copy the pre-built
C:/zynqus/pwr/sd/<folder>/boot.bin
to a blank SD card (image.ub, system.dtb, *.sh, and *.bit.bin may also be provided).
Note: Some measurement-only Power Advantage Tools do not contain a Pre-Built SD image. If this is the case, the tool is intended to be used to measure a design of your own choice
.
 C:/zynqus/pwr/sd/<Timestamp>_<Board>_<Description>.img
C:/zynqus/pwr/sd/20160922_zcu102_ubuntu.img
extremely
whatever drive selected will be overwritten
C:/zynqus/pwr/sd/<Timestamp>_<Board>_<Description>.img
C:/zynqus/pwr/sd/20160922_zcu102_ubuntu.img
extremely
whatever drive selected will be overwritten
- Unzip the image C:\zynqus\pwr\sd\<Timestamp>_<Board>_<Descripton>.zip (e.g. C:\zynqus\pwr\sd\20160922_zcu102_ubuntu.zip ).
- Run C:\ZynqUS_Demos\tools\Win32DiskImager-0.9.5-install.exe to install Win32DiskImager.
- Insert a 16GB SD card to be programmed. Note: Avoid Class 10 SD cards for 2017.1 and 2017.2 images (i.e. Class 4 is okay for these versions).
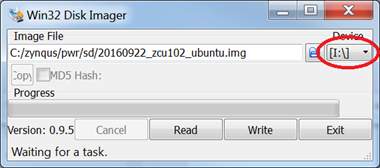
- Launch Win32DiskImager.
- Select the Image File:
C:/zynqus/pwr/sd/<Timestamp>_<Board>_<Description>.img
C:/zynqus/pwr/sd/20160922_zcu102_ubuntu.img
extremely
whatever drive selected will be overwritten
- When programming has completed, insert this SD card into the Xilinx Evaluation Board (e.g. ZCU102) and power cycle the evaluation board. In a minute, you should see the Ubuntu desktop on the DisplayPort monitor for Ubuntu SD images, or you should see a Linux prompt for all other Linux SD images. If you do not, please see Common Setup Issues below.